AnalyticsRules.Exchange
Over the weekend I finished a really fun project I had in mind for a couple of weeks.
My newest website: AnalyticsRules.Exchange
In this post I will explain the reason why I created this new website, as well on how I did it. At the moment I will not publish the code, not because I don’t want to share it, but because it’s super ugly and not something I want to be a source for other people to start with. Okay I want to hide it.
While I’m not going to share the code, there will be enough information for everybody willing to build something similar themselves.
Why I build a new website
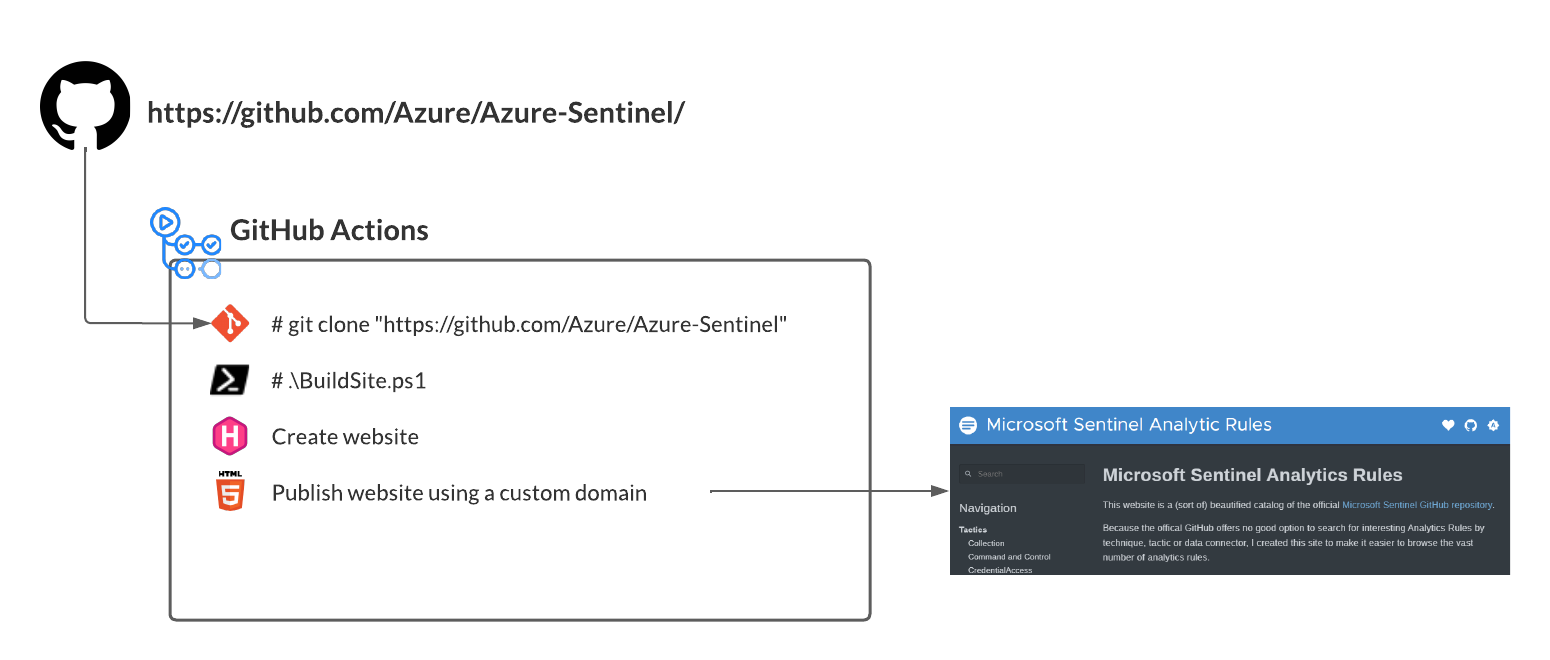
I’m a huge fan of the official Microsoft Sentinel (the repo is still called Azure Sentinel) repository on GitHub. It’s a community and vendor driven source of analytics rules for Sentinel, Microsoft’s SIEM solution. But it always bothered me that GitHub, as a code repository website, is not the best medium to search for good analytics rules.
While you can full text search the code, the search results are not easy to navigate.
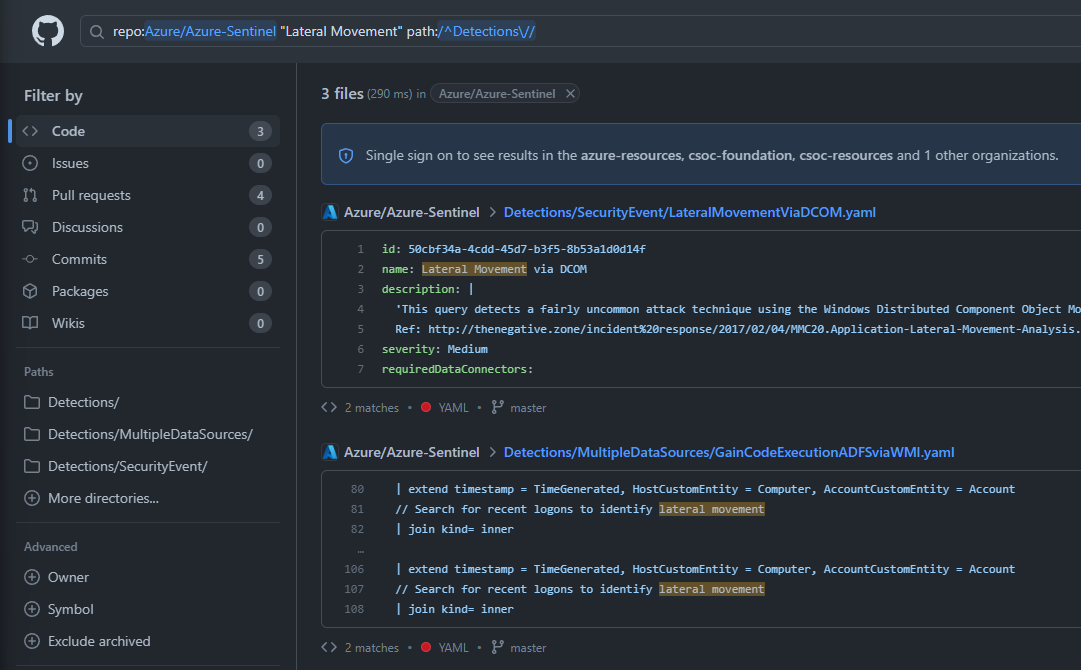
All Analytics rules in the repository are in a standardized YAML format that is almost ready to use in your own sentinel. Those files contain a lot of different information.
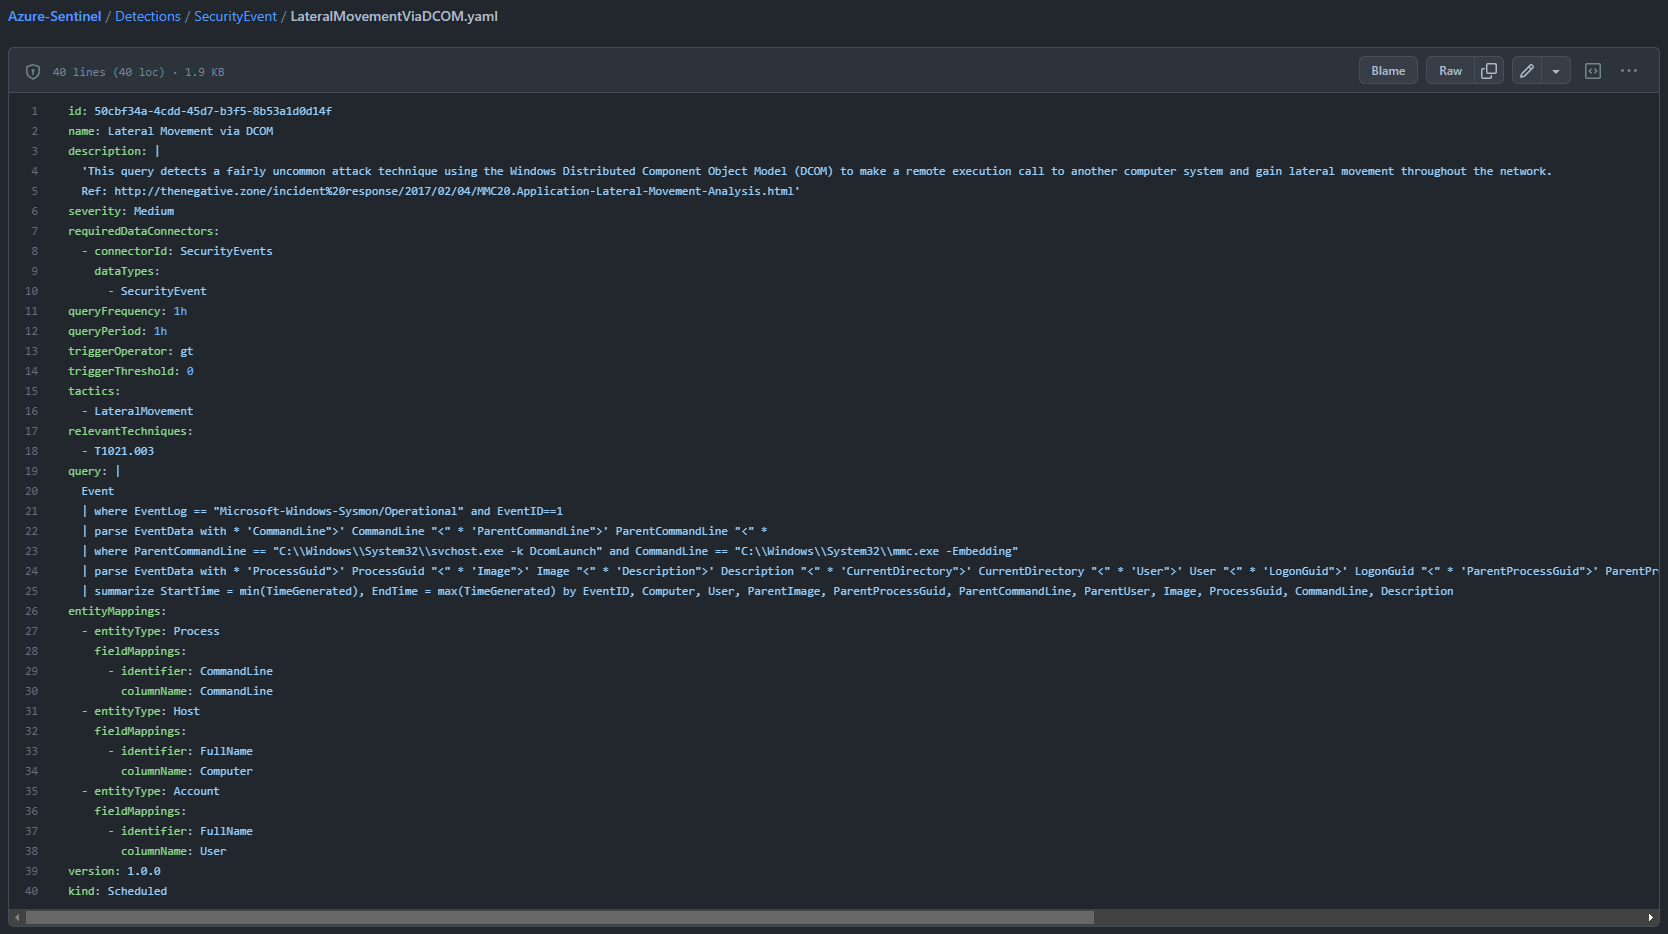
As you can see each analytics rule has a unique Id. This is important to e.g., check is there is an update to the rule.

Also, you have other context information like the name, a description, the data connectors needed, MITRE techniques and tactics as well as the author and more.
Since this information is in a standardized format it’s super easy to analyze it and convert it in any way you like.
So the idea was born to fetch all Analytics rules and convert them in HTML files which are searchable and easy on the eye.
Build a solution
After some initial ideas, I settled on a very streamlined solution with publicly available tools.

The tools and services I used are
- hugo - this is my favorite static website generator. You put in markdown files and get a complete website. Thanks to the many themes available the website even looks nice
- Geekdocs - this is the theme i choose for the website. Since it’s not a blog the documentation like structure is a very good fit
- hugo-tags-filter - this is a JavaScript extension for Hugo that allows filtering a list of items based on taxonomies you defined
- GitHub Pages - GitHub makes it super easy to build and host the website, without additional resources on my end. It has native support for Hugo and custom Workflows
Markdown creation
For creating the needed markdown files, I created a custom PowerShell script which does the following steps
- Use git to clone the Sentinel repository and have access to all the analytics rules.
- Loop through all YAML files and build a complete list including all information about the analytics rule. I used ConvertFrom-YAML for this part.
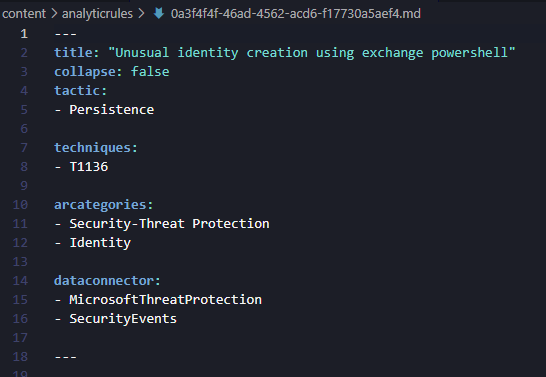
- Based on the MITRE tactics used, built a list per tactic, and create a markdown file. To don’t have to create a markdown table myself I leveraged the FormatMarkdownTable PowerShell Module
- For each analytics rule create a markdown file. I use a custom list of attributes I want to include everything else I skip. Also, I use a very basic template file, where I fill in the gaps at the correct place. One other crucial part is to include tags for the different filter-based use cases I want to use later on.
And that’s it. I now have a hundreds of markdown files, put in a special folder structure that hugo and the geekdocs theme can understand.
This solution allows me to scale pretty good, because I don’t have to bother keeping all those files in my repository. The only files that are part of the code base, are the templates as well as the sub files for the tag-based filtering.
Tag-based filtering
The JavaScript based solution hugo-tags-filter can use the taxonomies I included in the markdown files of the analytics rules.
Based on this information the filters are automatically created on the fly when hugo is creating the website.
You will have to declare each tag type to include and must create a separate filter page type for each new use case.
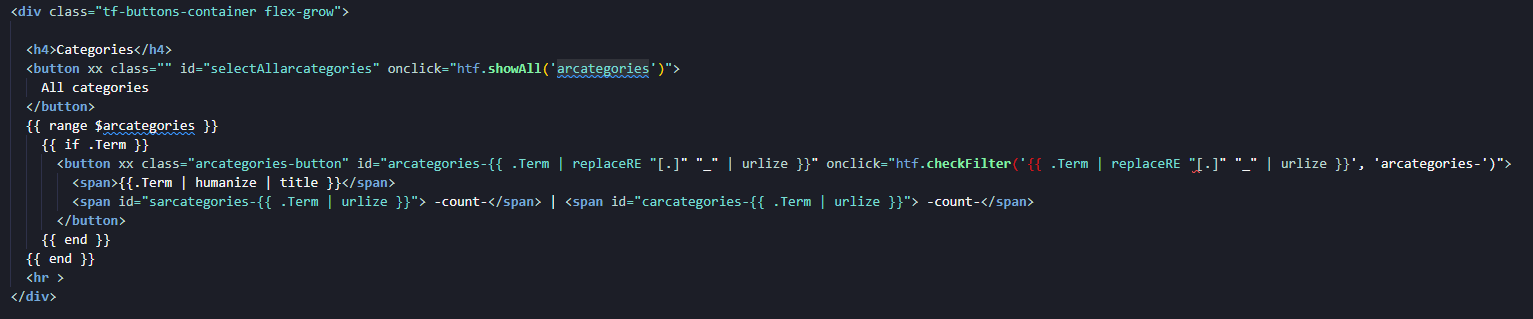
You are free in the definition of the variable names, but must declare them in the htfConfig configuration..
<script src="{{ "hugotagsfilter.js" | relURL}}"></script>
<script>
var htfConfig = {
  filters: [
    {
      name: 'arcategories',
      prefix: 'arcategories-',
      buttonClass: 'arcategories-button',
      allSelector: '#selectAllarcategories',
      attrName: 'data-arcategories',
      selectedPrefix: 'sarcategories-',
      countPrefix: 'carcategories-'
    }
  ],
  showItemClass: "show-item",
  filterItemClass: "tf-filter-item",
  activeButtonClass: "active",
  counterSelector: "selectedItemCount",
  populateCount: true,
  setDisabledButtonClass: "disable-button"
}
var htf = new HugoTagsFilter(htfConfig);
</script>
GitHub Pages and actions
To host the website I choose to use GitHub Pages. The service allows you to host your own website that is stored in a private or public repository.
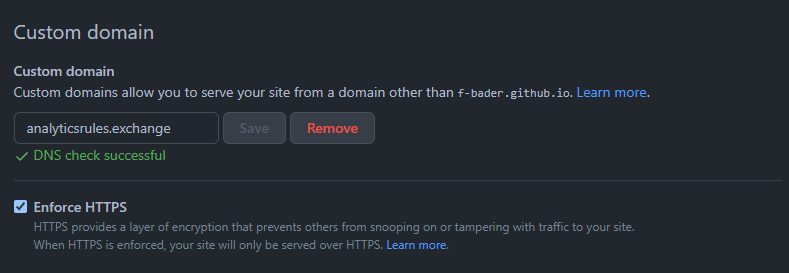
Custom domain name
You can use a custom domain name super easy. You create a CNAME DNS record that points to your own username of github.io e.g., username.github.io.
But CNAME records are only available for subdomains like www. But I wanted to use the apex domain name.
For this you must create A records for the following IP addresses:
- 185.199.108.153
- 185.199.109.153
- 185.199.110.153
- 185.199.111.153
There are other methods available, but those depend on the capabilities of your DNS provider.
After that you go to your repository and add the custom domain name in the repository settings.
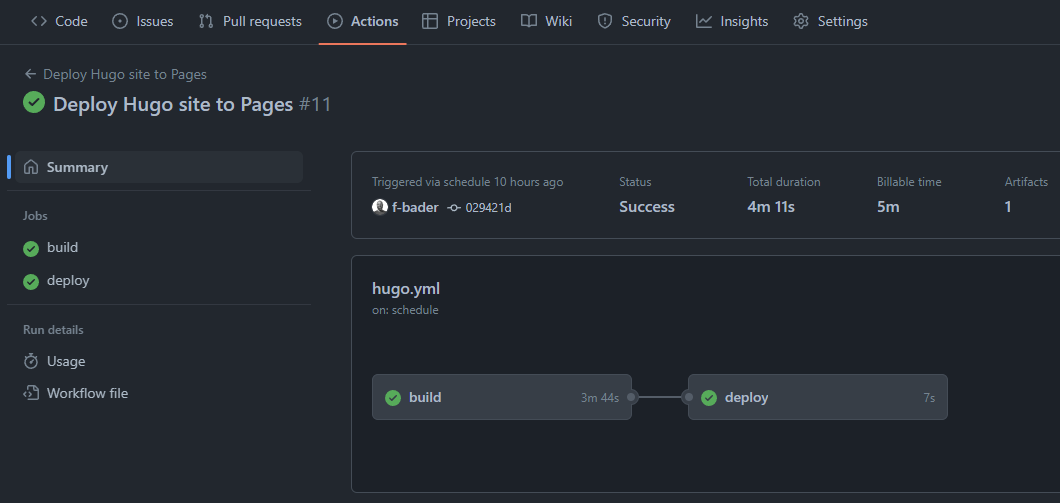
Actions
To deploy the website using hugo you must use GitHub actions. You are providing a yaml file that contains every step to be run as part of the build process.
|
|
My action workflow only differs in two parts from the code provided by GitHub.
- It runs twice a day on a schedule in addition to a push to main trigger.
- It also runs my custom PowerShell script
BuildSite.ps1right before building the website using hugo.
After hugo has done its part, the resulting website is then deployed to the GitHub pages storage and voila you can access and use the website.
Final design
Next steps
For the future of the website, I already have some ideas in mind and hope I can introduce even more little perks that make it easier to find and use analytics rules.
If you have any feedback on how I can improve the experience or feature requests, feel free to reach out to me.
I hope you enjoyed this blog post and give AnalyticsRules.Exchange a try.